
 Accept online payments from customers and members!
We built Flight Schedule Pro to help you delight your customers with user-friendly online scheduling, dispatch, maintenance, and pilot records.
Now, we’re delivering even further on that promise: Our new online payment feature lets you get paid sooner and even reward customers for their loyalty.
How? Three ways:
1) Allow your customers to see their balance right on their dashboard and make a credit card payment. Your customers can see when they owe you money, top off their account, and add funds for upcoming flights and training.
2) Automatically add bonus credit to your customers’ accounts when they make a prepayment. Just like fuel points, bonus credits are a smart way to keep your customers coming back. You can offer as much or as little credit as you want.
3) Using Price Groups, you can even require a certain amount of money-on-account in order to qualify for special rates! (this is an advanced feature I’ll talk more about later)
So, how do I set this up? And, what will it look like to my users? . . .I’m so glad you asked!
First, you’ll need to activate Billing & Point of Sale
Online payments are part of our new Billing & POS product which can be added on to any subscription. To activate it, sign in to your account and go to Settings > Billing & POS. In case you missed it, Billing & POS lets you check in flights and receive payments seamlessly, send receipts, and sync with QuickBooks.
See how Billing & POS helps you streamline your cash flow here.
Once you have Billing & POS activated, you can decide which payment options are available to your customers. Below, we’ll show you how to set up a few common options.
Accept payments online for balance due
With online payments, customers can see their balance right on their dashboard and make a payment using a credit card. This makes it easy to keep all your customers’ accounts up-to-date.
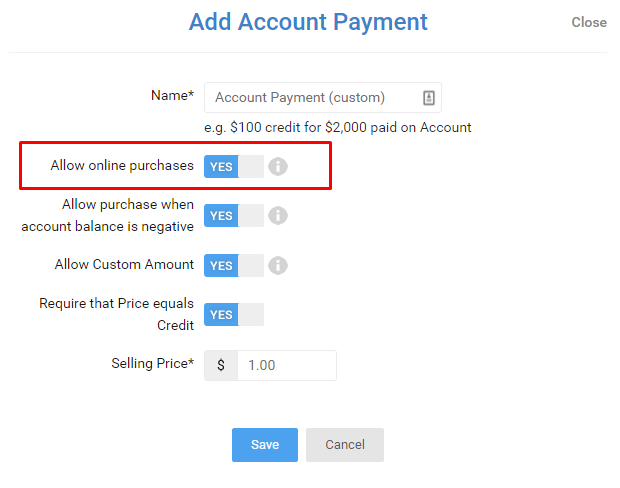
First, you’ll need to set up your Account Payment items. To do so:
- Go to your Settings and click on Billing & POS
- Then, click on Account Payments.
- Choose Add Account Payment and give it a name like “Account Payment (Custom Amount)”. To allow users to make a purchase online using this Account Payment, select “Allow online purchases”. Since this Account Payment is to allow people to pay down a balance due, select “Allow purchase when account balance is negative”, and “Allow custom amount”.
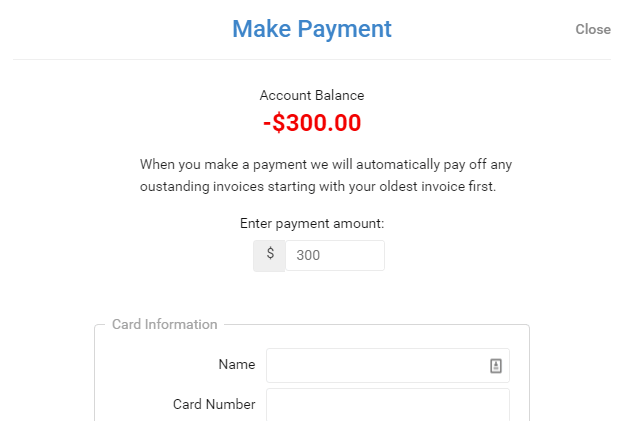
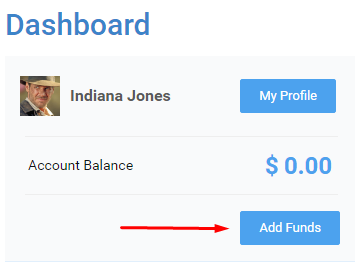
Customers with a negative balance will see the balance due in red on their dashboard. To make a payment online, they’ll simply click the “Make Payment” button. Keep in mind, only users with permission “View My Own Balance” can see this.

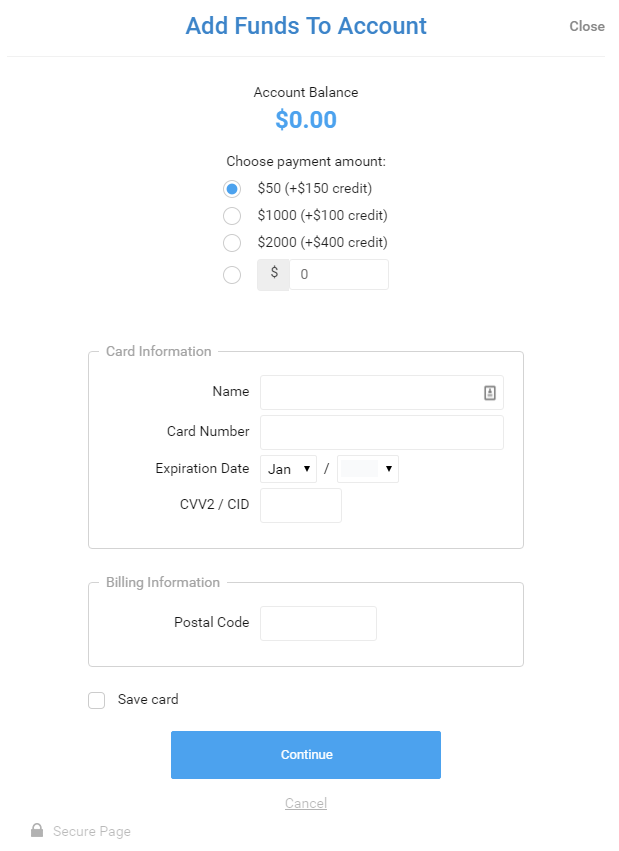
We’ll present them with Account Payment items you’ve configured:
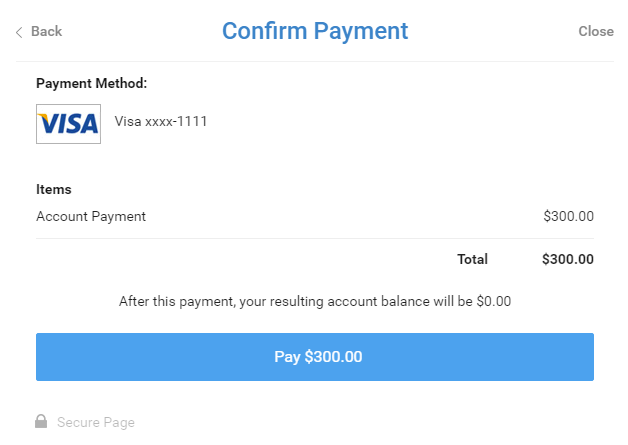
They can review prior to payment:
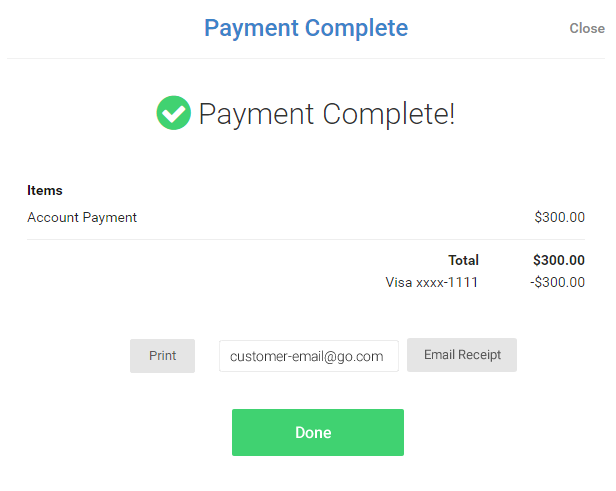
They can print a receipt or have it sent via email:
Reward customers for prepayments
You can even reward your customers for their loyalty by adding bonus credit to their account. For example, if a customer puts $1,000 on their account you can add $100 in credit to their account automatically. Just like fuel reward points, bonus credits are a smart way to keep customers coming back.
To do so:
- Go to your Settings and click on Billing & POS
- Create a New Account Payment and give it a name like “$1,000 Account Payment + $100 Credit”.
- Select the “Allow online purchases” option.
- Since you’re giving credit for a prepayment, be sure to disable the “Allow purchase when account balance is negative” option.

You can use the Add Account Payment box to add as many bonus credit options as you’d like. Here’s what your customers will see…
Customers see an Add Funds button. (Also keep in mind, only users with permission “View My Own Balance” can see this section)
Any relevant Account Payments you’ve configured will be presented as options:
Make it easy for customers to pay you
Making a payment is easy and intuitive. Customers can see their balance right on their dashboard and make a credit card payment (just like shopping on Amazon). Plus, Flight Schedule Pro generates a print or email receipt for the customer so you don’t have to.
Once you have this feature setup, tell people you have a new convenient way to pay! To help, we’ve included an Email Template below you can copy and paste to send out to customers and members.
Streamline your cash flow with Billing & Point of Sale
Online payments are just one of the ways our Billing & POS add-on makes it easier for you to grow your flight school. You can define special rates for members and staff, restrict scheduling by outstanding balance, record fuel reimbursements, and sync with QuickBooks to keep your books up-to-date. See how Billing & POS helps you streamline your cash flow here or Sign In and go to Settings > Billing & POS.
===============================================
Just for you: A Customizable Email Template you can send to customers to announce this new feature
(We recommend you paste this text into Notepad to clean the text before pasting into an outgoing email)
Subject line: New convenient way to pay!
Hello,
Now you can make payments and prepay your account online through Flight Schedule Pro. Top up your account with a few clicks and the funds are available right away.
When you log into your account, you’ll see your current balance in the upper left-hand corner of your dashboard. Click the “Add Funds” or Make a Payment button to make a secure payment. You can choose to print or email your receipt.
Plus, right now you’ll receive {$X in bonus credit} when you put {$X} on your account!
We hope you enjoy our new online payment feature!
{Insert Your Company Name}